GPT Image 2.5 Image Editing: Sketches, Annotations and Transparency
Editorial
9/12/2026
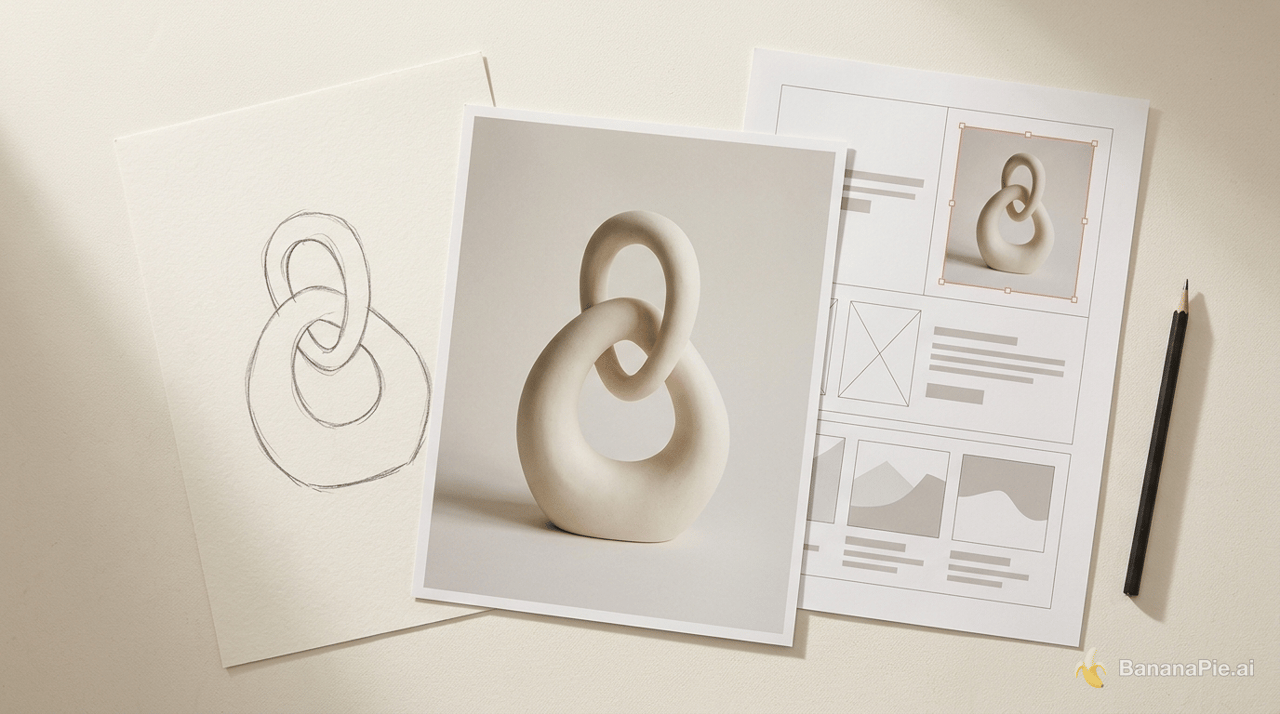
GPT Image 2.5 image editing is most useful when you already have a visual direction and need control over the result. A rough sketch can become a sculpture photo, annotations can replace selected images without disturbing the surrounding layout, and an alpha-channel prompt can produce a transparent asset. The practical upgrade is the ability to carry an image through these changes while preserving the parts you want to keep.
GPT Image 2.5 image editing gives you more local control
The strongest improvement is local editing. Earlier edits could enlarge text in the upper-left corner while accidentally changing content in the upper-right. In the website mockup example, the updated workflow replaced the requested images and kept the surrounding design intact. That makes it useful for revising an existing composition instead of rebuilding it after every correction.
In Banana Pie, GPT Image 2.5 Flare is positioned as the everyday default, while GPT Image 2.5 Sunburst is positioned for precision editing. Choose the former for everyday generation and the latter when control over a requested change is the priority. The GPT Image 2.5 Flare vs GPT Image 2.5 Sunburst comparison develops that task-based choice.
Both models offer these settings in Banana Pie:
- Reference images: up to 8.
- Resolution: 1K, 2K, or 4K.
- Relevant aspect ratios: 16:9 for a presentation cover and 9:16 for a vertical promotional composition.
The drawing, template, and annotation steps below describe ChatGPT’s web interface. Banana Pie provides the model choices and settings listed above; the ChatGPT menu actions belong to that separate workflow.
Annotate each replacement to preserve the surrounding layout
Annotations make a replacement instruction specific to an area. This is especially useful in a website mockup, where changing a content image should leave nearby text, spacing, and other images intact.
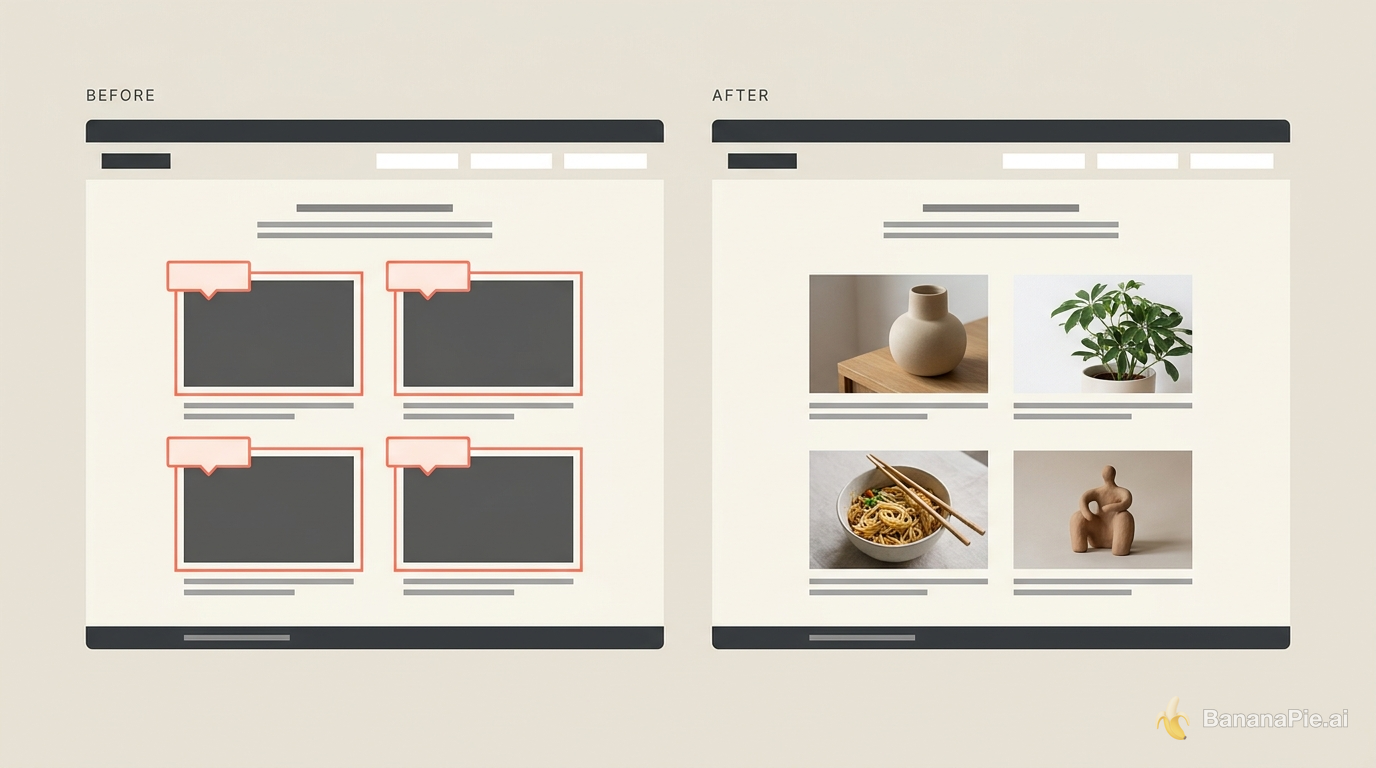
Assign a separate replacement instruction to each target area.
- Generate a website-mockup-style reference image in ChatGPT’s image mode.
- Open Edit and add an annotation to the image area you want replaced.
- Describe the replacement in that annotation. Repeat for each target area.
- Send the annotations together, then review the changed areas alongside the surrounding layout.
The concrete example used 4 annotations, with these replacements assigned to separate targets:
Replace this image with Tongshen.

Replace this image with Guanzhang.

Replace this image with Jiumei eating beef noodles.

Replace this image with Pepe the Frog.
All the requested replacements appeared, while the surrounding mockup remained intact. The important part of the method is the pairing: each target area gets its own replacement instruction, and the edits are submitted together.
For a broader preservation method, use a controlled workflow for consistent image editing alongside these targeted replacements.
Turn a rough sketch into a sculpture photo or gouache illustration
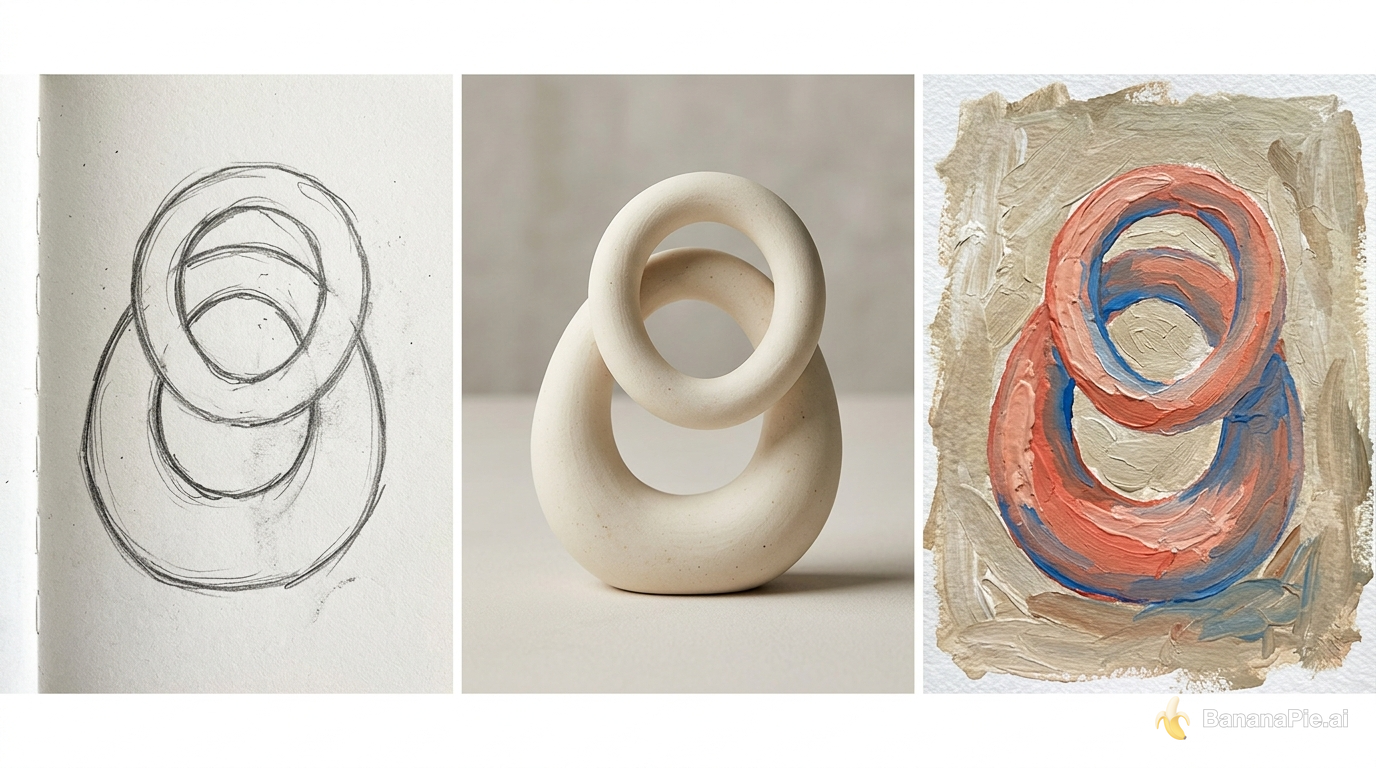
A sketch can supply the form while a short prompt supplies the rendering direction. The simplest example used an informal freehand shape and just “make it realistic”. The result was a realistic sculpture image based on the drawing.
- In ChatGPT’s web interface, enter image-generation mode from the conversation, or open the plus menu and choose Create Image.
- Choose Draw and Attach Image.
- Draw a simple shape and attach it to the conversation.
- Submit “make it realistic”.
- Review how the generated sculpture carries the form of your drawing into a photographic treatment.
This is a useful starting point when you can draw the silhouette more easily than you can describe it. The sketch does not need to be a finished illustration: the casual doodle was enough to establish the object’s shape.
For a painted result, upload a prepared sketch in image mode and use a template’s art-style selection. Choosing thick gouache turned the sketch bearing the wording “Soul Club” into a polished illustration. The same basic workflow therefore supports different finishes: a short realism instruction for a photographic object, or an explicit painting style for an illustrated asset.
Detailed descriptions are worthwhile once the form is established. GPT Image 2.5 handles textures, actions, and expressions better than the older model, whose fine detail was less convincing when enlarged. Use those details to describe the finish you want rather than stopping at a broad style label.
Use template questions to define what changes and what stays
Templates are useful because they turn missing decisions into guided questions. They provide an adjustable prompt, collect your answers, and consolidate them into a text input. The room-redesign example shows how that helps establish both the desired style and the preservation requirements before generation.
- Open Templates and choose the interior-design workflow.
- Upload a photo of the current room.
- Answer the questions about how the space will be used, what you want to change, and which objects must remain.
- Specify “Keep the existing decoration and furniture.”
- Select minimalism as the target interior style and generate the image.
The template gathered the brief through 3 questions, and the minimalist room-planning image appeared in less than a minute. The preservation instruction was a central part of that brief: it told the model which existing elements needed to carry into the redesign.
This question-driven approach also works for sketch conversion. In the gouache example, the template presented an art-style choice. You can customize the template prompt so that it asks for the desired style or another required decision before each generation.
To make the style decision explicit in your template prompt, write:
Before generating the image, ask me which art style I want.
Use my uploaded sketch as the reference for the illustration.
Use a template when your recurring task has recurring decisions. A room redesign needs the room’s purpose and the items to preserve; a sketch conversion needs the rendering style. Gathering those inputs first makes the brief more deliberate.
Request an alpha channel for a transparent asset
If you want transparency from the initial generation, include the instruction “Make the background an alpha channel.” This produced a transparent image directly and avoided a separate background-removal pass.
Use the attached sketch to create a thick-gouache illustration.
Make the background an alpha channel.
For an image you have already generated, open Edit in ChatGPT and select Remove Background. Download the resulting image.
For an existing photo, Banana Pie’s free browser-based background remover returns a transparent PNG.
Place the downloaded image over a black background in presentation software to inspect the cutout. The downloaded asset in the background-removal example showed transparent surroundings and clean, detailed edges against the black slide. That viewing step makes the result easy to judge: the slide background should show through around the subject, including around its finer details.
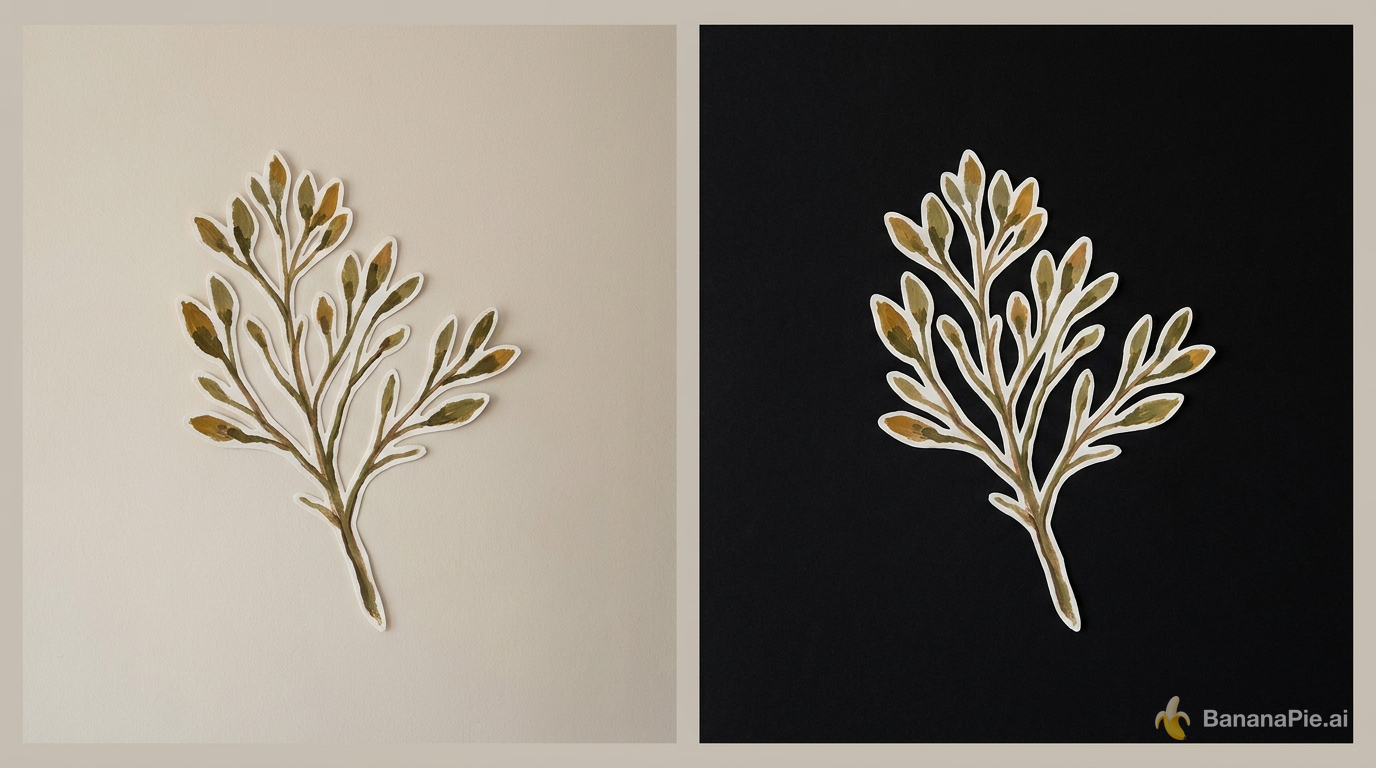
Inspect the gaps between stems and the fine leaf edges against black.
Choose the route according to the asset’s current state. Add the alpha-channel instruction when preparing the generation prompt; use background removal when the artwork already exists. The direct instruction matters because transparency needs to be part of the request if you want it in the initial output.
Adapt the illustration to a 16:9 slide cover
Once the illustration is ready, ChatGPT’s Resize editing action can ask the AI to generate it in a different ratio. For a presentation cover, the demonstrated setting was 16:9.
- Open the generated illustration in Edit.
- Choose Resize and request a 16:9 presentation cover.
- Download the adapted image and review its composition at the wider ratio.
The downloaded example measured 1672 × 941 and carried 72 dpi metadata. Those are the properties of that particular ChatGPT download. Banana Pie separately lists 1K, 2K, and 4K output options for both GPT Image 2.5 models.
When you want to hand off the recipe for the image, use Share Prompt Template in ChatGPT’s sharing controls. It provides a way to share the prompt template when that is the material your collaborator needs.
Define the landing-page sections before generating the long graphic
A vertical promotional graphic needs a clear reading order. The initial request specified 9:16, a top-to-bottom arrangement, and an introduction to AJ’s brand. It also asked ChatGPT to find relevant image material online and use a supplied portrait wherever the person appeared.
The broad request became an extended iteration sequence. Over 12 minutes, it produced multiple versions and then drifted into unwanted variations. The useful target was more specific: a hero image, a services image, a YouTube content image, and a call-to-action image stacked vertically.
Use the intended section sequence to write a more specific brief:
Create a 9:16 promotional landing-page graphic introducing my brand.
Arrange the content vertically, from top to bottom:

Hero image
Services section
YouTube content section
Call-to-action section

Use the brand information I provide.
Find relevant image material online.
Where I appear, use my supplied portrait.
The online-material instruction belongs to the ChatGPT workflow. Upload your portrait when requested so the design has the intended source image for your likeness.
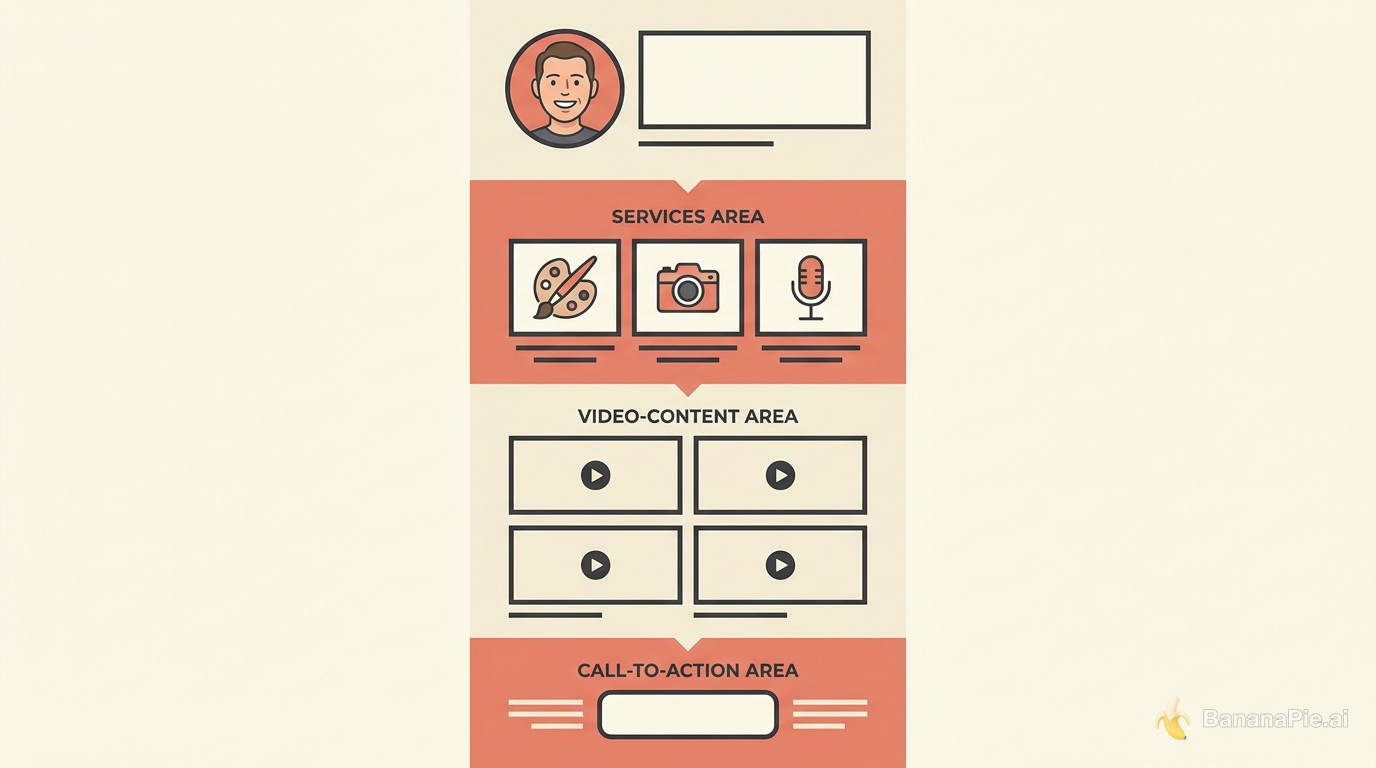
Define the section order in your brief: hero, services, YouTube content, and call to action. A broad instruction to introduce a brand leaves more decisions open than a named sequence of hero, services, content, and call to action.
This format is useful for crowdfunding, online-course promotion, and product sales. Treat the output as a long promotional image for the campaign, with each section serving a distinct purpose in the reading sequence.
FAQ
How do I turn a sketch into a realistic image with GPT Image 2.5?
Attach your sketch in ChatGPT’s image mode and enter “make it realistic”. A simple hand-drawn shape became a realistic sculpture image with this prompt. For an illustrated result, use the sketch as a reference and select a style such as thick gouache.
How do I edit specific parts of an image with GPT Image 2.5?
Open ChatGPT’s image editor, add an annotation to each area you want changed, and describe the replacement for that area. In the website mockup example, 4 annotations replaced the selected images while preserving the surrounding layout.
What prompt creates a transparent background in GPT Image 2.5?
Add “Make the background an alpha channel” to your image request. This produced a transparent background directly. You can also use Remove Background on an existing image.
How do I make a GPT Image 2.5 image fit a presentation cover?
Use ChatGPT’s image editor’s Resize option and request 16:9. The sketch-based illustration was adapted to that ratio for a presentation cover.
How do I create a landing-page graphic with GPT Image 2.5?
Specify a vertical landing-page graphic and name the sections in reading order: hero, services, YouTube content, and call to action. Supply your portrait when the design needs your likeness. The resulting long promotional image can support a sales page, crowdfunding campaign, or online course.
Which GPT Image 2.5 models can I use in Banana Pie?
GPT Image 2.5 Flare is positioned as the everyday default, while GPT Image 2.5 Sunburst is positioned for precision editing. Banana Pie supports up to 8 reference images and output up to 4K with either model.
How do I preserve furniture when redesigning a room with GPT Image 2.5?
Upload a photo of the room, describe its intended use and what you want changed, and specify which items must remain. The room example requested that the existing decoration and furniture stay, then selected minimalism as the target style.
Start with an asset and a specific change
Choose the workflow that matches what you have: a sketch for generating a finished form, an existing composition for annotated replacements, or a defined section sequence for a promotional page. For a transparent illustration, include the alpha-channel instruction from the start; for a slide cover, set the target to 16:9.
If your finished photo only needs transparency, use Banana Pie’s free background remover to create a transparent PNG.