Nano Banana 2.1 Cinematic Styles: Build a Reusable Grid
Editorial
10/10/2026
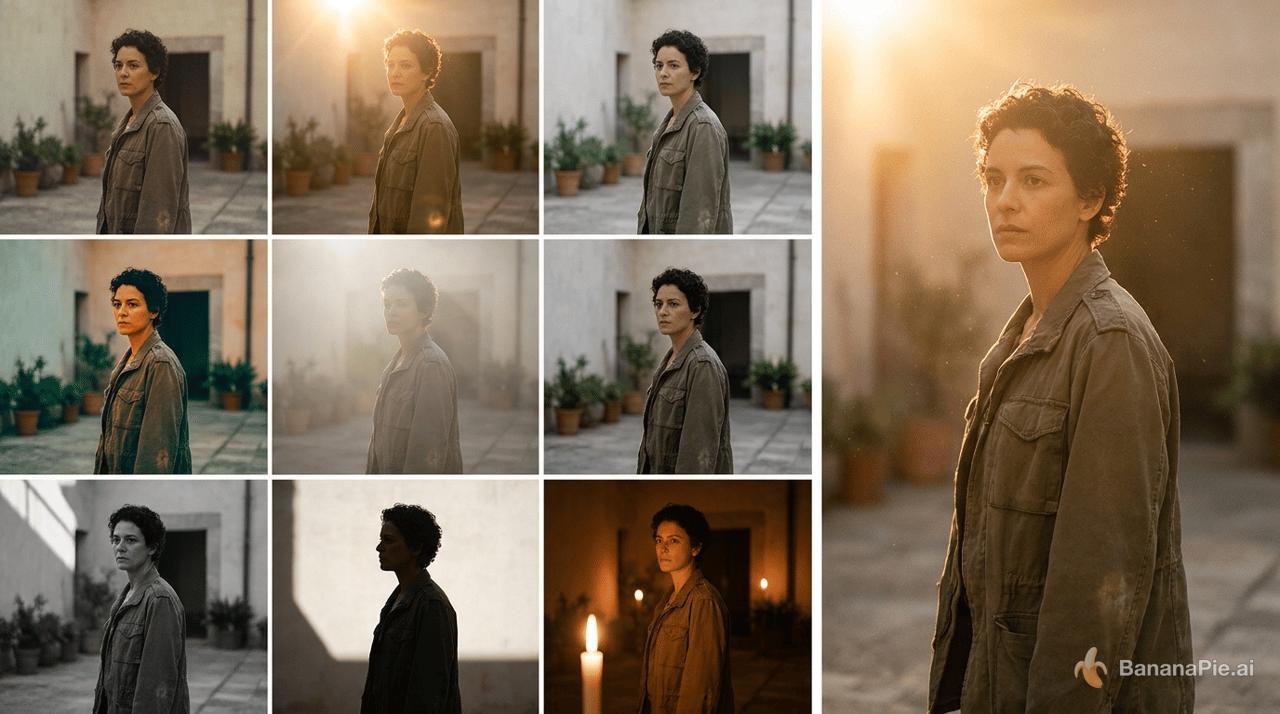
A labeled grid is the most useful starting point for exploring Nano Banana 2.1 cinematic styles: you get visual options and the words to recreate them in the same image. Choose a panel, copy its description, and combine it with a character reference and a simple scene prompt. The same workflow also exposes where an attractive image still misses the brief—through incorrect gaze direction, misplaced text or swapped props.
Choose a lighting treatment from the grid, then carry that treatment into a character scene.
Nano Banana 2.1 cinematic styles start with a labeled grid
Nano Banana 2.1 handles visibly different lighting treatments well. Its lighting grid distinguished monochrome film noir shadows, silhouettes and the shadow changes caused by moving a light source higher or lower. A separate cinematic scene stood out for its sun and airborne dust.
Those strengths do not settle every production decision. In an Iceland aurora scene, the person looked toward the house instead of the northern lights, and the illumination appeared to spill confusingly from the house. Treat your style grid as a starting point for visual direction, then judge the resulting scene against its specific requirements.
Build a labeled grid of nine cinematic styles
The grid works because it puts a look and its reusable vocabulary together. You can compare treatments without writing a separate scene prompt for every style.
-
Request nine cinematic styles in a labeled grid. Ask for descriptive words inside each panel, so the image also becomes a prompt reference. Use this prompt structure to request the grid:
Create a grid showing nine different cinematic styles. Label each panel with descriptive words I can reuse in a prompt to recreate that look. Include seventies, golden hour, natural light, teal and orange, atmospheric, and deep focus treatments. -
Compare the visual treatment with the label. Golden hour should give you a different direction from teal and orange or deep focus. The atmospheric treatment was especially appealing; use that panel as a candidate when you want a more moody scene.
-
Explore lighting more specifically with a lighting grid. Keep the subject consistent and request named treatments:
Show the same subject in a grid of different lighting treatments:
film noir, silhouette, surrounding light,
a higher directed light source, and lower candlelight.
Make the lighting differences visible in the shadows
and in how much of the background can be seen.
The useful evidence is in the shadows. Film noir produced a black-and-white image with diagonal shadows. The silhouette treatment reduced the subject to its outline, while surrounding light traced the subject. A higher directed light and lower candlelight changed the shadow direction in visibly different ways.
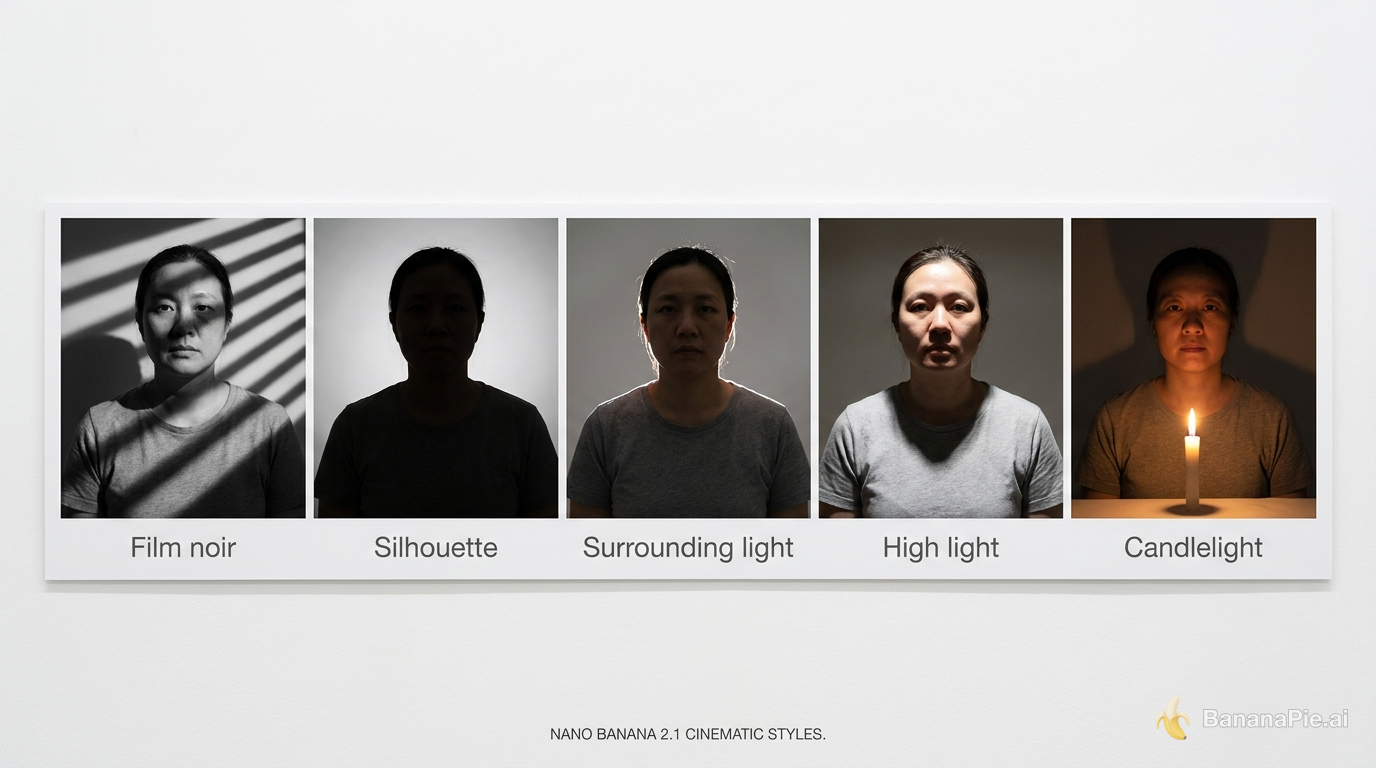
Compare the diagonal shadows, silhouette and rim light, then inspect how high and low light sources change the shadows.
These are the details to inspect before reusing a label. A panel called “film noir” earns its place through its monochrome treatment and shadow geometry, rather than through the words alone.
Reuse the grid labels with a character reference
Once you have a panel you like, carry its actual descriptive words into a new scene. Keep the location description simple enough that you can see what the style contributes.
-
Download the grid and copy the chosen label. In Mac Preview, select the text inside the panel and copy it. Typing the words manually also works. For a browser alternative, use Banana Pie’s image-to-text tool to extract the words and copy the result.
-
Supply your character reference. Combine the reference with a basic description of where the character should be, then append the copied style wording. A reusable structure is:
Show the character from the reference image in [scene location]. Use this cinematic treatment: [paste the descriptive words from the selected grid panel]. -
Compare the treatment on another character. Reuse the style words while changing the character reference. Look for the same lighting or focus treatment carrying into the new image.
The method worked with a more human-looking character as well as a stylized one. Deep focus and atmospheric treatments offered distinct directions, while the golden-hour result showed visibly warm backlighting. That backlight is a useful cue: it gives you something concrete to compare with the original panel.
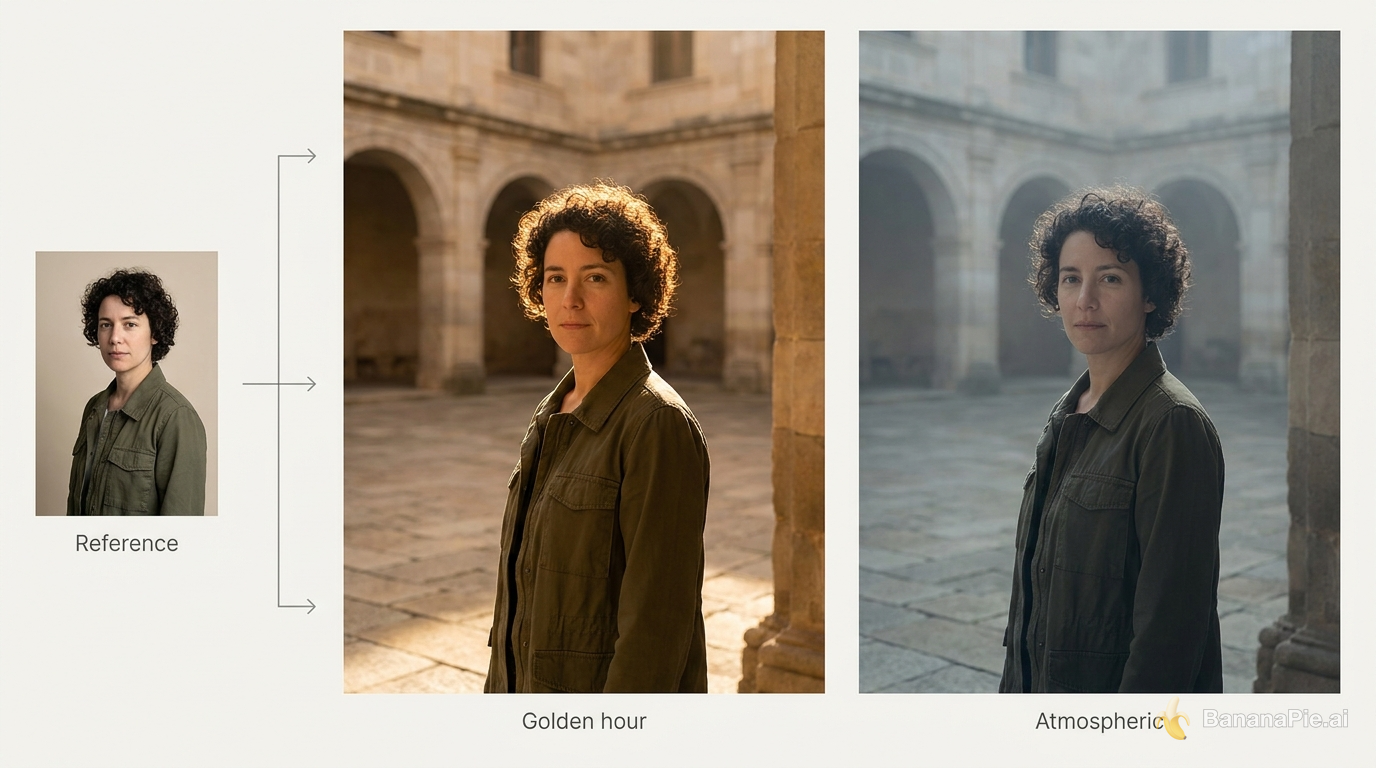
Look for warm backlighting in the golden-hour treatment and consistent character details across both courtyard portraits.
Avoid rewriting the entire prompt just to explore another look. Keep your character and basic location description, then swap the style words. You are choosing a treatment for the scene, so make that treatment the main variable.
Fix book-page structure before replacing the text
Nano Banana 2.1 can put a substantial, readable passage onto a book page, but text accuracy and book structure are separate problems. The book example began with a cover featuring the characters from a film adaptation of The Sun Also Rises, then requested an open spread containing the ending passage.
The first result was largely readable. It also put a blank page in the wrong place, overlapped some letters and added “The End” without being asked. Repairing the image required more than asking for clearer text.
-
Start with the book reference and supply the full passage. The initial instruction was straightforward:
Show this book open at its final pages. The text reads exactly: [insert the complete passage you want on the page]. -
Assign each element to a specific side. Placing the passage on the left and a commemorative stamp on the right corrected the content placement. That instruction asked for a date beneath the stamp wording without specifying the date itself. The result still included the intended 1926–2026. For your own spread, put the date directly into the prompt. Use this template:
Open the book at its final pages. On the left page, place the exact passage supplied previously. On the right page, place a commemorative stamp reading “Centenary”. Put the date 1926–2026 beneath the stamp wording. -
Resolve the physical final-page appearance. Correct left/right placement did not make the spread look like the book’s final page. A further revision addressed that structure. The later result also had an appealing old-book appearance.
-
Remove and restore the affected text. Once the layout was in place, removing all text from the left page and adding the passage again improved readability. Make those separate edits:
Remove all text from the left page.Then:
Add the following text to the left page exactly:
[insert the complete passage].
Using the same book reference image and prompt for a comparison, GPT Image 2 produced awkward-looking page margins.
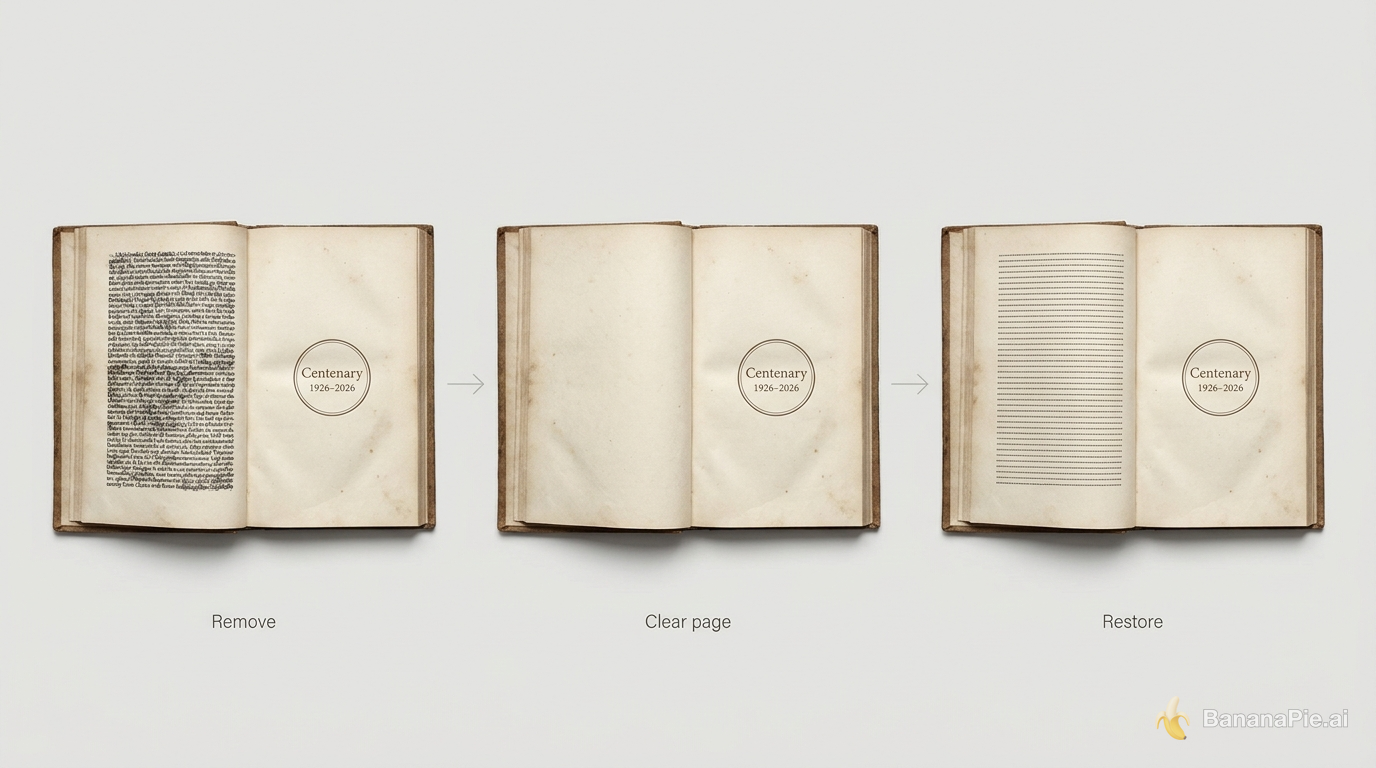
Clear the left-page text, then add the complete passage again; keep the right-page stamp and spread structure unchanged.
The order matters. First resolve which side holds the passage and which holds the stamp. Then resolve whether the spread physically resembles the end of a book. Finally, repair the lettering. A cleaner passage does not fix the wrong page arrangement.
For a broader approach to preserving reference details through successive changes, the guide to consistent image editing develops that controlled workflow further.
Judge lighting and prompt adherence separately
When comparing outputs, use the same brief and hide the model labels before choosing. Judge creative diversity, prompt adherence and reference fidelity separately. An image can win on atmosphere while failing the requested action. Our Nano Banana 2 vs Nano Banana 2.1 comparison applies the same approach: one fixed brief per scenario, judged task by task.
The airplane scene makes that distinction clear. Some people initially ran toward the aircraft when everyone was supposed to run away. The scene was rerun to correct the action. Afterward, Nano Banana 2.1 showed better diversity among the people, while a competing result showed less diversity than before. The first preference did not hold across the rerun.
For that brief, inspect movement direction before deciding which crowd looks more varied. Both requirements matter, but they answer different questions.
Lighting comparisons also produced different preferences. Nano Banana 2.1 was the strongest-looking result in the sun-and-dust scene because those atmospheric elements worked especially well. A separate scene combined exterior dusk, interior house glow and motorcycle brake lights; another output was preferred there.
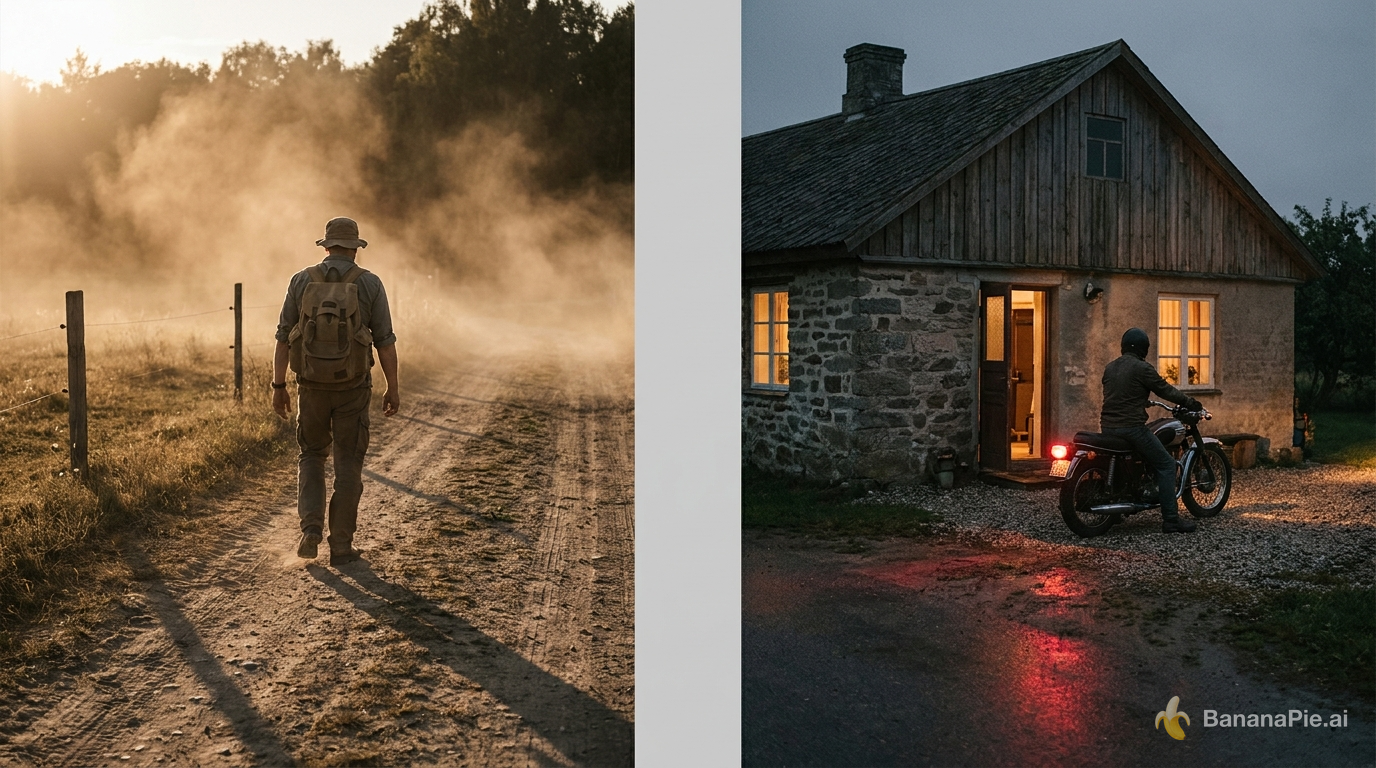
Observe the atmosphere created by sunlight and airborne dust, then separately inspect the positions of the dusk light, interior lights and brake lights.
The Iceland scene was more revealing still. Nano Banana 2.1 directed the person’s gaze toward the house instead of the aurora, and the apparent source of the illumination was confusing. The favored alternative included reflections in the river and window, a relaxed cat and a person looking upward.
When your brief combines indoor and outdoor light, inspect where each light appears to originate. When the subject is meant to look at the sky, judge that gaze independently of the landscape. Strong sun and dust do not establish that the model will also deliver the best mixed lighting or eye direction.
Keep character identity and prop ownership separate
The swamp exercise combined Jake, Devin, Busker and Cleo, each with an assigned tool. This exercise mixed individual character images, character reference sheets and previously saved characters. The important task was to bring the people into the scene in the requested order, doing the requested things.
The strongest result preserved that order and the assigned actions. Another image had appealing trees and sky but pushed the people too far toward adventure-hero styling. A different output swapped object ownership: a man held the flashlight assigned to a woman, while she held the phone assigned to him.
Inspect identity, order and object ownership independently. Recognizable faces do not establish correct prop assignments, and attractive scenery does not establish faithful character styling. State each person’s object explicitly when you write the scene description.
In Banana Pie, Nano Banana 2.1 supports up to 8 reference images and 1K, 2K or 4K output. Its aspect ratios extend from 1:8 to 8:1. In Banana Pie, use character images and character reference sheets as reference inputs. Those settings give you room for several character references and wide or tall compositions; your prompt still needs to define who belongs where and what each person carries.
FAQ
How do I create cinematic styles with Nano Banana 2.1?
Generate a grid of nine cinematic styles with descriptive words inside each panel. Copy the words from the style you want, then combine them with a character reference and a simple scene description. Demonstrated treatments include a seventies look, golden hour, natural light, teal and orange, atmospheric lighting and deep focus.
Can Nano Banana 2.1 follow different lighting styles?
Yes. The lighting grid showed distinct film noir shadows, a silhouette, surrounding light and changes in shadow direction between a higher light source and lower candlelight. Use named lighting styles when you want visibly different treatments of the same subject.
Can Nano Banana 2.1 generate readable book pages?
Nano Banana 2.1 produced readable passages across a book page, but some letters overlapped and it added an unsolicited ending label. Removing the text from the left page and adding it again improved readability. Specify the page layout as well as the exact text.
How do I control left and right page placement in Nano Banana 2.1?
Tell it which content belongs on each side of the spread. Assigning the passage to the left page and a centenary stamp to the right corrected content placement in the book edit. The physical appearance of the final page needed a separate revision.
How do I fix overlapping text in Nano Banana 2.1?
Remove the existing text from the affected page, then add the passage again. This improved readability after the layout revisions had already placed the text on the correct side.
How many reference images can I use with Nano Banana 2.1?
Banana Pie supports up to 8 reference images with Nano Banana 2.1. When combining characters, specify their order and which object each person should carry. Judge those assignments separately from how closely the people match the references.
Does Nano Banana 2.1 support 4K output?
Yes. Banana Pie offers 1K, 2K and 4K output for Nano Banana 2.1, with aspect ratios from 1:8 to 8:1.
Is Nano Banana 2.1 the best model for cinematic images?
Choose according to the image task. Nano Banana 2.1 stood out for sun and dust, while another result was preferred for a scene combining dusk, interior light and motorcycle brake lights. Compare the same brief for lighting, prompt adherence, diversity and reference fidelity.
Turn your chosen panel into a scene
Generate your cinematic grid, choose a treatment and reuse its words with a character reference. Start with a simple location description, then inspect the result for the lighting you selected, the subject’s gaze and any assigned props.
When your grid is ready, extract its style labels so you can reuse the wording in your next prompt.